Ice Dams: What Causes Them (and How to Prevent the Roof Wrecking Crew)
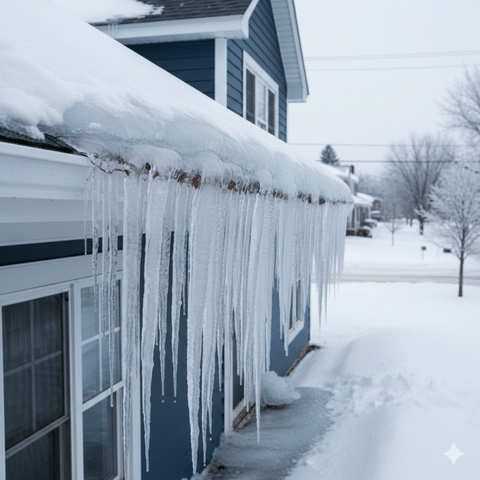
What Is an Ice Dam?
An ice dam is a ridge of ice that forms along the lower edge of a roof (usually at the eaves). It blocks melting snow from draining off the roof. That trapped water has only one direction left to go: backward and upward, under shingles and into the roof system.
As Eddie Griffin puts it: “Water doesn’t negotiate. If you give it a path, it’s taking it.”
The Real Cause of Ice Dams (It’s Not “Too Much Snow”)
Snow is just the ingredient. The recipe for an ice dam needs three things:
- attic hatches and pull-down stairs
- recessed lights and ceiling fixtures
- bathroom fans venting into the attic
- plumbing chases, chimneys, and wall tops
- leaky ductwork
Eddie’s rule of thumb: “If your attic feels cozy in January, your roof is paying the price.”
2) A roof surface warm up top and cold at the edges
Here’s the winter magic trick:
- The upper roof warms enough to melt snow.
- The eaves overhang outside the house and stay colder.
- Meltwater flows down and refreezes at the colder edge, building a dam.
Or, in Eddie-speak: “Your roof should be cold like a freezer, not warm like a coffee cup.”
3) Repeated melt-freeze cycles
Daytime melting + nighttime freezing = ice dam growth on repeat.
Eddie calls it the “snowmelt treadmill”: “Once that melt-freeze cycle starts, it’ll keep feeding itself until you change the conditions.”
Why Ice Dams Are a Big Deal
Ice dams don’t usually cause damage by “breaking shingles.” They cause damage by forcing water where it doesn’t belong.
Common signs and consequences:
- water stains on ceilings or walls wet insulation (which kills energy efficiency)
- moldy attic smells peeling paint
- bubbling drywall
- hidden rot at the eaves and roof deck
Eddie’s warning sign: “When you see a ceiling stain in winter, don’t call it ‘a small leak.’ Call it a message.”
How to Prevent Ice Dams (The Fix Is Usually Inside, Not Outside)
Think of prevention like a three-layer winter jacket for your home: air seal, insulate, ventilate. Step
1: Air Seal the Attic Floor (Most Important)
Stopping warm air leakage is the #1 best move.
Target these areas:
- attic access hatch/pull-down stairs (add weatherstripping + insulated cover)
- recessed can lights (use rated airtight fixtures or proper covers)
- plumbing stacks and electrical penetrations (foam/seal)
- chimney chase gaps (fire-rated sealing where required)
- bathroom/kitchen fans (vent outdoors, not into the attic)
Step 2: Upgrade Insulation (After Air Sealing)
Insulation works best when air leaks are controlled. Otherwise, it’s like wearing a winter coat with the zipper open.
Common goals:
- bring attic insulation up to modern recommended levels for your climate
- ensure insulation is evenly distributed and not compressed
- insulate and seal ductwork if it runs through attic space
Eddie’s no-nonsense reminder: “You can’t insulate a draft.”
Step 3: Improve Roof Ventilation (Balance Matters)
Ventilation helps keep the roof deck cold and consistent, reducing melt/refreeze behavior.
A good system typically includes:
- intake ventilation at soffits
- exhaust at ridge (or high roof vents)
- clear airflow path above insulation (baffles at eaves)
Eddie’s ventilation analogy: “A roof has to breathe. If it can’t inhale at the soffits and exhale at the ridge, you’re asking for trouble.”
Roof-Side Protections (The “Seatbelt” Layer)
Even with a well-sealed home, harsh winters can still create risk. Roof-side measures help protect you when conditions get extreme.
Ice & Water Shield at Eaves and Valleys
This waterproof membrane goes under shingles in vulnerable areas. When water backs up, it hits this layer instead of bare decking.
Eddie’s take: “Ice and water shield is the backup plan you hope you never need, but you’ll be glad it’s there.”
Quality Edge and Flashing Details
Clean, correct edge detailing helps water move off the roof and reduces entry points during backup.
Eddie’s mantra: “Most leaks don’t come through the shingle field. They come from details.”
Gutter Maintenance
- Clogged gutters can worsen backups and create big refreeze zones at the eaves.
- keep gutters
- clean ensure downspouts drain away from the home
- fix sagging sections that hold water
Eddie keeps it simple: “If water can’t leave the roof, it’s going to visit your living room.”
What About Heat Cables?
Heat cables can be a helpful band-aid for chronic ice dam areas, but they’re not the cure.
Use them when:
- a specific valley/eave area ices repeatedly
- ventilation/insulation upgrades are limited (finished attics, low-slope areas)
- you need protection while planning long-term fixes
Eddie’s verdict: “Heat cables are a tool, not a solution. Fix the house, not just the symptom.”
What To Do If You Already Have an Ice Dam
If you’re seeing active leaking:
- Protect the interior: buckets, towels, move valuables
- Call a pro for safe removal and leak control
- Don’t chop at the roof (shingles lose that fight)
- If safe from the ground, use a roof rake to remove snow from the lower 3–6 feet of roof
Eddie’s safety PSA: “A hospital bill costs more than a roof repair. Keep your boots on the ground.”
Need Help? Brown Roofing Won’t Let You Down.
If you’re dealing with ice dams, attic frost, winter leaks, or repeat icicle build-up, we can help identify the root cause and recommend the right fix, not just a temporary patch. “A good roof in winter is boring. No drama. No stains. No surprises.” – Eddie Griffin. Brown Roofing Company, Inc. proudly serves homeowners across Fairfield, Litchfield, and New Haven Counties with proven roof systems and winter-ready workmanship. Call today to schedule a roof inspection 1-203-723-1372)and get ahead of the next storm.